
Vanilla Javascript로 React UseState Hook 만들기
본 포스트는 React의 useState Hook의 작동방식에 대해 고민해보고, 구현해보고, 최적화하는 내용을 다룹니다.
선행학습
구현부 코드는 아래 포스트의 내용을 모르면 이해하기가 힘들 수 있습니다.
1. React의 useState
(1) 의문을 갖기
필자는 React를 사용할 때 hook api들을 보면서 항상 신기했다.
function Counter () {
  const [count, setCount] = useState(1);

  // 돔에서 직접 호출하기 위해 window(전역객체)에 할당
  window.increment = () => setCount(count + 1);

  return `
    <div>
      <strong>count: ${count} </strong>
      <button onclick="increment()">증가</button>
    </div>
  `;
}
- useState로 state와 setState를 만들 수 있다.
- 500ms(0.5초)마다 setCount를 실행한다.
- 값이 1씩 증가한다.
- setCount가 실행되면 다시 렌더링이 실행된다.
- 렌더링이 실행되면 Counter가 다시 실행될 것이다.
- Counter 컴포넌트가 다시 실행되어도 count의 값은 초기화되지 않고 유지된다.
핵심은 5번의 내용이다. 컴포넌트 함수가 다시 실행 되더라도 count의 값이 초기화되지 않는 다는 것이다. 어떻게 이게 가능할까?
(2) bottom - up 분석
밑 바닥 부터 차근차근 useState 에 대해 분석해보자.
이번 섹션의 목적은 count의 값이 어떻게 초기화되지 않고 유지 되는지 알아보는 것이다.
일단 Counter 컴포넌트를 렌더링 해주는 코드를 작성해보자.
/** HTML **/
<div id="app"></div>

/** Javascript **/
function useState (initState) { }

function Counter () {
  const [count, setCount] = useState(1);

  window.increment = () => setCount(count + 1);

  return `
    <div>
      <strong>count: ${count} </strong>
      <button onclick="increment()">증가</button>
    </div>
  `;
}

function render () {
	const $app = document.querySelector('#app');
	$app.innerHTML = Counter();
}

render();
아마도 이런 형태일 것이다.
React를 사용하는 사람들이라면, 위의 코드를 보고 useState와 render와의 관계를 유추할 수 있다.
useState를 실행하면 첫 번째 인자는 state를 반환하고, 두 번째 인자는 state를 변경하는 setState를 반환하다. 그리고 setState 를 실행하면 render가 실행된다.
그래서 대략 다음과 같은 형태의 코드가 될 것이다.
function useState(initState) {
  let state = initState; // state를 정의한다.
  const setState = (newState) => {
    state = newState; // 새로운 state를 할당한다
    render(); // render를 실행한다.
  }
  return [ state, setState ];
}
useState를 실행하면 내부에 state를 정의하고, setState를 실행하면 내부에 선언된 state를 변경할 것이다. 즉, 함수가 실행될 때 마다 결국 state의 값은 initState 로 초기화 될 것이다.
const [count, setCount] = useState(1); // state에는 항상 1이 들어간다.
결과물에서도 확인할 수 있듯이, state에는 항상 1이 들어간다.
그래서 state의 값은 내부가 아닌 외부에서 관리해야 한다.
let state = undefined;
function useState(initState) {
  // state에 값이 없을 때만 초기화를 진행한다.
  if (state === undefined) {}
    state = initState;
  }
  const setState = (newState) => {
    state = newState; // 새로운 state를 할당한다
    render(); // render를 실행한다.
  }
  return [ state, setState ];
}

function Counter() { /*생략*/ }
function render () { /*생략*/ }

render();
잘 실행되고 있다.
그런데 만약 useState와 Component가 여러 개라면 어떨까?
function Counter () {
  const [count, setCount] = useState(1);

  window.increment = () => setCount(count + 1);

  return `
    <div>
      <strong>count: ${count} </strong>
      <button onclick="increment()">증가</button>
    </div>
  `;
}

function Cat () {
  const [cat, setCat] = useState('고양이');

  window.meow = () => setCat(cat + ' 야옹!');

  return `
    <div>
      <strong>${cat}</strong>
      <button onclick="meow()">고양이의 울음소리</button>
    </div>
  `;
}

function render () {
  app.innerHTML = `
    <div>
      ${Counter()}
      ${Cat()}
    </div>
  `;
}
한 개의 state 변수로 두 개의 state를 관리하기 때문에 count와 cat이 똑같은 값을 보여주게 된다.
이를 해결하기 위해서 외부의 state 갯수를 useState가 실행되는 횟수만큼 만들어주면 될 것이다.
let currentStateKey = 0; // useState가 실행 된 횟수
const states = []; // state를 보관할 배열
function useState(initState) {
  // initState로 초기값 설정
  if (states.length === currentStateKey) {
    states.push(initState);
  }

  // state 할당
  const state = states[currentStateKey];
  const setState = (newState) => {
    // state를 직접 수정하는 것이 아닌, states 내부의 값을 수정
    states[currentStateKey] = newState;
    render();
  }
  currentStateKey += 1;
  return [ state, setState ];
}

function Counter () { /*생략*/ }
function Cat () { /*생략*/ }

const render = () => {
  app.innerHTML = `
    <div>
      ${Counter()}
      ${Cat()}
    </div>
  `;
  // 이 시점에 currentStateKey는 2가 될 것이다.
  // 그래서 다시 0부터 접근할 수 있도록 값을 초기화 해야 한다.
  currentStateKey = 0;
}
여기까지가 useState의 핵심 원리이다. 생각보다 간단하지 않은가?
클로저
사실 이건 클로저에 대한 이해가 먼저 필요하다. 직접적으로 클로저를 사용하진 않았지만 유사한 개념이라고 볼 수 있다.
function 클로저() {
  let 죽지않는_변수 = 0;
  return function () {
    죽지않는_변수 += 1;
    console.log('죽지않는_변수 : ' + 죽지않는_변수);
  }
}
const 클로저로_만들어진_함수 = 클로저();
클로저로_만들어진_함수(); // 죽지않는_변수 : 1
클로저로_만들어진_함수(); // 죽지않는_변수 : 2
클로저로_만들어진_함수(); // 죽지않는_변수 : 3
클로저로_만들어진_함수(); // 죽지않는_변수 : 4
useState 함수의 바깥에서 state를 관리하기 때문에 state의 값이 유지되는 것이다.
2. useState 최적화
앞선 과정은 useState가 값을 보존하는 방법에 대해 분석해보는 내용이었다. 이제 useState를 최적화 해보자.
(1) 변경된 값이 없을 경우
먼저 고민해볼 수 있는 상황은 setState에 state와 동일한 값을 넣었을 경우이다.
function Counter () {
  const [count, setCount] = useState(1);
  window.nochange = () => setCount(1); // count에 똑같은 값을 삽입한다.
  return `
    <div>
      <strong>count: ${count} </strong>
      <button onclick="nochange()">변화없음</button>
    </div>
  `;
}

let renderCount = 0;
const render = () => {
  const $app = document.querySelector('#app');
  $app.innerHTML = `
    <div>
      renderCount: ${renderCount}
      ${Counter()}
    </div>
  `;
  currentStateKey = 0;
  renderCount += 1;
}
값은 똑같은데 render는 계속 실행하고 있다.
이럴 때는 렌더링이 되지 않도록 방지해야한다.
function useState(initState) {
  // initState로 초기값 설정
  const key = currentStateKey;
  if (states.length === key) {
    states.push(initState);
  }

  // state 할당
  const state = states[key];
  const setState = (newState) => {
    // 값이 똑같은 경우
    if (newState === state) return;

    // 배열/객체일 때는 JSON.stringify를 통해 간단하게 비교할 수 있다.
    // 그런데 Set, Map, WeekMap, Symbol 같은 원시타입의 경우
    // JSON으로 파싱되지 않기 때문에 주의해야한다.
    if (JSON.stringify(newState) === JSON.stringify(state)) return;

		// 기존 값과 다른 경우에만 값을 변경하고 render()를 실행한다.
    states[key] = newState;
    render();
  }
  currentStateKey += 1;
  return [ state, setState ];
}
이제 값이 똑같을 경우에는 렌더링이 되지 않는다.
(2) 동시에 여러 setState가 실행될 경우
일단 다음과 같이 하나의 함수에 setState가 두 번 사용 되는 경우가 있다.
function CounterAndMeow () {
  const [count, setCount] = useState(1);
  const [cat, setCat] = useState('야옹! ');

  function countMeow (newCount) {
    setCount(newCount);
    setCat('야옹! '.repeat(newCount));
  }

  window.increment = () => countMeow(count + 1);
  window.decrement = () => countMeow(count - 1);

  return `
    <div>
      <p>고양이가 ${count}번 울어서 ${cat} </p>
      <button onclick="increment()">증가</button>
      <button onclick="decrement()">감소</button>
    </div>
  `;
}

let renderCount = 0;
const render = () => {
  const $app = document.querySelector('#app');
  $app.innerHTML = `
    <div>
      ${renderCount}
      ${CounterAndMeow()}
    </div>
  `;
  renderCount += 1;
  currentStateKey = 0;
}
countMeow 를 실행할 때 마다 render는 2번 실행된다. 즉, 비효율적이다.
이를 해결할 수 있는 방법 중 하나가 debounce 를 이용하는 것이다.
주절주절 설명하기보단, 코드로 살펴보자.
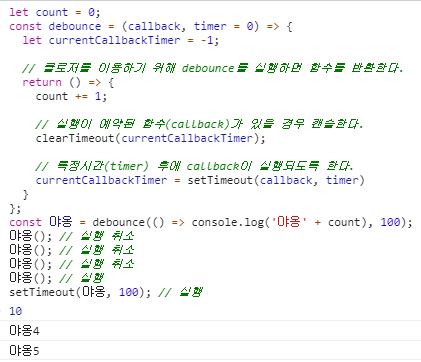
let count = 0;
const debounce = (callback, timer = 0) => {
  let currentCallbackTimer = -1;

  // 클로저를 이용하기 위해 debounce를 실행하면 함수를 반환한다.
  return () => {
    count += 1;

    // 실행이 예약된 함수(callback)가 있을 경우 캔슬한다.
    clearTimeout(currentCallbackTimer);

    // 특정시간(timer) 후에 callback이 실행되도록 한다.
    currentCallbackTimer = setTimeout(callback, timer)
  }
};
const 야옹 = debounce(() => console.log('야옹' + count), 100);
야옹(); // 실행 취소
야옹(); // 실행 취소
야옹(); // 실행 취소
야옹(); // 실행
setTimeout(야옹, 100); // 실행
- 일반적으로 우리가 사용하는 모니터의 주사율은 60프레임이다.
- 즉, 1초에 60번의 변화가 발생하는 것이다.
- 따라서 1프레임 이내로 발생하는 모든 변화를 모아서 실행시켜주면 어떨까?
- render가 1초에 최대 60번만 실행되면 되도록 만들면 되지 않을까?
setInterval(() => console.log('실행'), 1000 / 60); // 1초에 60번 실행된다.
이 때 이용할 수 있는 API가 바로 requestAnimationFrame 이다.
requestAnimationFrame(callback)은 브라우저에게 수행하기를 원하는 애니메이션을 알리고, 다음 리페인트가 진행되기 전에 인자로 넘겨진callback함수를 호출한다.- 일반적으로 requestAnimationFrame이 1초동안 실행되는 횟수는 대부분의 브라우저에서는 W3C 권장사항에 따라 디스플레이 주사율과 일치하게 된다.
- 60Hz -> 1초에 60회
- 144Hz -> 1초에 144회
- 240Hz -> 1초에 240회
const fn = requestAnimationFrame(() => {
  console.log('실행');
  fn();
})
fn();

// fn은 1초에 60번 실행된다.
// 만약 모니터의 주사율이 144HZ 일 경우, 1초에 144번 실행될 것이다.
어쨌든 다시 requestAnimationFrame을 이용하여 debounce를 다시 만들어보자.
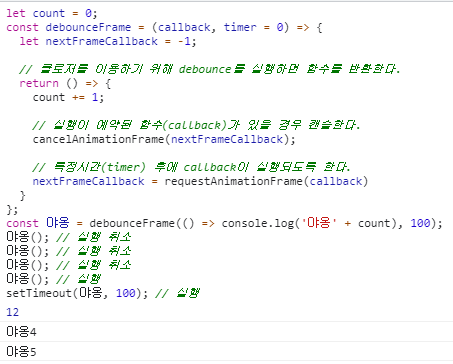
let count = 0;
const debounceFrame = callback => {
  let nextFrameCallback = -1;

  // 클로저를 이용하기 위해 debounce를 실행하면 함수를 반환한다.
  return () => {
    count += 1;

    // 실행이 예약된 함수(callback)가 있을 경우 캔슬한다.
    cancelAnimationFrame(nextFrameCallback);

    // 특정시간(timer) 후에 callback이 실행되도록 한다.
    nextFrameCallback = requestAnimationFrame(callback)
  }
};
const 야옹 = debounceFrame(() => console.log('야옹' + count), 100);
야옹(); // 실행 취소
야옹(); // 실행 취소
야옹(); // 실행 취소
야옹(); // 실행
setTimeout(야옹, 100); // 실행
사실 setTimeout을 사용하는 것과 크게 다르지 않다.
이벤트루프
- setTimeout과 requestAnimationFrame이 실행되는 시점에 대해 정확하게 이해하기 위해선
이벤트 루프라는 개념에 대해 알아야한다. - 이에 대한 내용은 자바스크립트와 이벤트 루프 | NHN Clound Meetup 아티클에 자세히 나와있으니 참고하면 될 것 같다.
이러한 내용을 바탕으로 리팩토링을 진행해보자.
function debounceFrame (callback) {
  let nextFrameCallback = -1;
  return () => {
    cancelAnimationFrame(nextFrameCallback);
    nextFrameCallback = requestAnimationFrame(callback)
  }
};

let renderCount = 0;
const render = debounceFrame(() => {
  const $app = document.querySelector('#app');
  $app.innerHTML = `
    <div>
      renderCount: ${renderCount}
      ${CounterAndMeow()}
    </div>
  `;
  renderCount += 1;
  currentStateKey = 0;
});
사실 debounce는 useState에 적용하기보단 render에 적용하는게 더 쉽고 직관적이다.
일단 이정도만 적용해도 useState를 이용하는데 큰 어려움은 없으리라 생각한다.
3. render 함수 추상화
- 이제 끝인줄 알았다면 매우 큰 오산!
- useState는 필연적으로 render와 같이 사용된다.
아주 그냥 천생연분이다.- 둘 사이를 외부에서 간섭하지 못하게 함수로 보호해주자.
function MyReact () {
  function useState () {}
  function render () {}

  return { useState, render };
}

const { useState, render } = MyReact();
이렇게 사용할 경우 useState와 render는 내부적으로 엮기가 더 쉬워진다. 다른 변수들도 추가해보자.
function MyReact () {
  let currentStateKey = 0;
  const states = [];
  function useState () {}

  let renderCount = 0;
  function render () {}

  return { useState, render };
}

const { useState, render } = MyReact();
이렇게 하면 currentStateKey와 renderCount는 함수 내부에서만 사용할 수 있다. useState와 render에서만 접근 가능한 것이다.
다시 내용을 채워보자.
function MyReact () {
  // 내부에서 사용되는 변수는 options에 모아놓기
  const options = {
    currentStateKey: 0,
    renderCount: 0,
    states: [],
  }

  function useState(initState) {
    const key = options.currentStateKey;
    if (states.length === key) states.push(initState);

    const state = states[key];
    const setState = (newState) => {
      states[key] = newState;
      render();
    }
    options.currentStateKey += 1;
    return [ state, setState ];
  }

  function render () {}

  return { useState, render };
}

const { useState, render } = MyReact();
눈치빠른 사람들(?)은 render가 이전 처럼 사용될 수 없으리라는 것을 알았을 것이다.
이제 render는 다음과 같이 사용되어야 한다.
const { render } = MyReact();
const App = () => `
  <div>
    ${CounterAndMeow()}
  </div>
`;
render(App, document.querySelector('#app'));
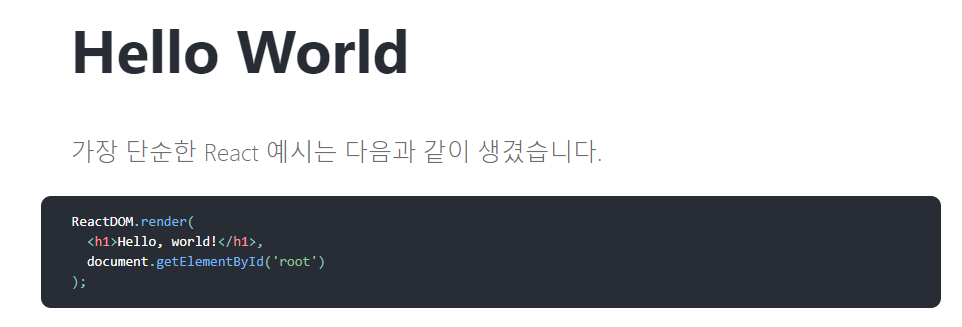
사실 위의 코드는 React의 HelloWorld 코드와 똑같다.
어쨌든 render를 한 번 구성해보자.
function MyReact () {
  // 내부에서 사용되는 변수는 options에 모아놓기
  const options = {
    currentStateKey: 0,
    renderCount: 0,
    states: [],
    root: null,
    rootComponent: null,
  }

  function useState(initState) { /*생략*/}

  // render는 일종의 바지사장이라고 보면 될 것 같다.
  function render (root, rootComponent) {
    options.root = root;
    options.rootComponent = rootComponent;
    _render();
  }

  // 내부적으로 _render를 이용하여 상태변화에 대응한다.
	const _render = debounceFrame(() => {
    const { root, rootComponent } = options;
    if (!root || !rootComponent) return;
    root.innerHTML = rootComponent();
    options.currentStateKey = 0;
    options.renderCount += 1;
  });

  return { useState, render };
}
_render라는 비선실세(?)가 render라는 바지사장을 세워놓고 일하는 것이다.
최근에 드라마 빈센조를 재밌게 봤는데,
render는장한서고_render는장준우라고 보면 될 것 같다.- 비유가 좀 이상한가?
이제 useState의 코드도 조금 변경해야한다.
function useState (initState) {
  const { currentStateKey: key, states } = options;
  if (states.length === key) states.push(initState);

  const state = states[key];
  const setState = (newState) => {
    states[key] = newState;
    _render(); // 사실 이 부분만 변경되면 된다.
  }
  options.currentStateKey += 1;
  return [ state, setState ];
}
전체적인 코드는 다음과 같다.
function MyReact () {
  const options = {
    currentStateKey: 0,
    renderCount: 0,
    states: [],
    root: null,
    rootComponent: null,
  }

  function useState (initState) {
    const { currentStateKey: key, states } = options;
    if (states.length === key) states.push(initState);

    const state = states[key];
    const setState = (newState) => {
      states[key] = newState;
      _render();
    }
    options.currentStateKey += 1;
    return [ state, setState ];
  }

  const _render = debounceFrame(() => {
    const { root, rootComponent } = options;
    if (!root || !rootComponent) return;
    root.innerHTML = rootComponent();
    options.currentStateKey = 0;
    options.renderCount += 1;
  });

  function render (rootComponent, root) {
    options.root = root;
    options.rootComponent = rootComponent;
    _render();
  }

  return { useState, render };

}

const { useState, render } = MyReact();

function CounterAndMeow () {
  const [count, setCount] = useState(1);
  const [cat, setCat] = useState('야옹! ');

  function countMeow (newCount) {
    setCount(newCount);
    setCat('야옹! '.repeat(newCount));
  }

  window.increment = () => countMeow(count + 1);
  window.decrement = () => countMeow(count - 1);

  return `
    <div>
      <p>고양이가 ${count}번 울어서 ${cat} </p>
      <button onclick="increment()">증가</button>
      <button onclick="decrement()">감소</button>
    </div>
  `;
}

function debounceFrame (callback) {
  let nextFrameCallback = -1;
  return () => {
    cancelAnimationFrame(nextFrameCallback);
    nextFrameCallback = requestAnimationFrame(callback)
  }
};

const App = () => `
  <div>
    ${CounterAndMeow()}
  </div>
`;

render(App, document.querySelector('#app'));
위와 같이 잘 작동하는 것을 확인할 수 있다.
4. 모듈화
이제 모듈화를 해보자. 전체적인 디렉토리 구성은 다음과 같다.
.
├─ src
│   ├─ components
│   │  └─ CounterAndMeow.js
│   ├─ core
│   │  └─ MyReact.js
│   ├─ utils
│   │  └─ debounceFrame.js
│   ├─ App.js
│   └─ main.js
└─ index.html
/index.html
<!DOCTYPE html>
<html lang="en">
<head>
  <meta charset="UTF-8">
  <meta name="viewport" content="width=device-width, initial-scale=1.0">
  <title>MyReact App</title>
</head>
<body>
<div id="app"></div>
<script type="module" src="./src/main.js"></script>
</body>
</html>
/src/main.js
import { render } from "./core/MyReact.js";
import { App } from "./App.js";

render(App, document.querySelector('#app'));
/src/App.js
import { CounterAndMeow } from "./components/CounterAndMeow.js";

export const App = () => `
  <div>
    ${CounterAndMeow()}
  </div>
`;
/src/utils/debounceFrame.js
export function debounceFrame (callback) {
  let nextFrameCallback = -1;
  return () => {
    cancelAnimationFrame(nextFrameCallback);
    nextFrameCallback = requestAnimationFrame(callback)
  }
};
/src/core/MyReact.js
import { debounceFrame } from "../utils/debounceFrame.js";

function MyReact () {
  const options = {
    currentStateKey: 0,
    renderCount: 0,
    states: [],
    root: null,
    rootComponent: null,
  }

  function useState (initState) {
    const { currentStateKey: key, states } = options;
    if (states.length === key) states.push(initState);

    const state = states[key];
    const setState = (newState) => {
      states[key] = newState;
      _render();
    }
    options.currentStateKey += 1;ㅇ
    return [ state, setState ];
  }

  const _render = debounceFrame(() => {
    const { root, rootComponent } = options;
    if (!root || !rootComponent) return;
    root.innerHTML = rootComponent();
    options.currentStateKey = 0;
    options.renderCount += 1;
  });

  function render (rootComponent, root) {
    options.root = root;
    options.rootComponent = rootComponent;
    _render();
  }

  return { useState, render };

}

export const { useState, render } = MyReact();
/src/components/CounterAndMeow.js
import { useState } from "../core/MyReact.js";

export function CounterAndMeow () {
  const [count, setCount] = useState(1);
  const [cat, setCat] = useState('야옹! ');

  function countMeow (newCount) {
    setCount(newCount);
    setCat('야옹! '.repeat(newCount));
  }

  window.increment = () => countMeow(count + 1);
  window.decrement = () => countMeow(count - 1);

  return `
    <div>
      <p>고양이가 ${count}번 울어서 ${cat} </p>
      <button onclick="increment()">증가</button>
      <button onclick="decrement()">감소</button>
    </div>
  `;
}
코드에 대한 설명은 생략하겠다. 이미 앞선 과정에서 많이 다뤘기 때문이다.
이렇게 useState 그리고 이와 강하게 엮여있는 render에 대해서 다뤄봤다.
여기에 diff 알고리즘까지 사용한다면 더욱더 완성도 있는 렌더링 시스템이 되리라 생각한다.
그리고 지금은 이벤트를 관리하는 방법이 무척 잘못된 상태다.
따라서 위와 같이 구성했을 때 어떤 방식으로 이벤트를 관리하면 좋은지에 대해서도 다룰 수 있을 것 같다.
전체 예제코드
이 포스트에 사용된 모든 코드는 이 저장소 에서 확인할 수 있다.
- 01. state 틀 구성
- 02. 한 개의 state만 있을 경우
- 03. 여러 개의 state가 있을 경우 버그 발생
- 04. 여러 개의 state가 있을 경우 정상 작동
- 05. state 값이 동일할 경우
- 06. state 값이 동일할 경우 렌더링 방지
- 07. 불필요한 render 발생
- 08. debounce로 렌더링을 리팩토링
- 09. render 추상화
- 10. 모듈화
Summary
- useState에 대해 분석하기
- 클로저에 대한 이해
- useState 최적화하기
- 값이 변경되지 않는 경우
- 렌더링 최적화하기
- 동시에 setState가 실행되는 경우
- debounce로 최적화하기
- requestAnimationFrame 이용하기
- 모듈화